How to Use Google Maps
By Corbin HartwickUpdated on January 22, 2018
Are you ready to start finding your way with Google Maps? In this tutorial, we’ll go over the basic things you’re going to see on the website, many of which we’ll be covering in detail in later tutorials.
The first step to using Google Maps is to go to www.google.com/maps in your web browser, so do that now if you haven’t already.
The interface for Google Maps will take up your entire web browser screen, so it can be a little daunting to find and remember where everything is and what it does. We’ll break down the different areas of the interface to make it a little easier for you.
Main Screen
The area closest to the middle of the screen is where most of the action happens. If you click on the name or icon of a location, the map will zoom in to focus on that location, and any relevant information about that location will show up in the “Search and Information” window in the top-left corner (more on that later).

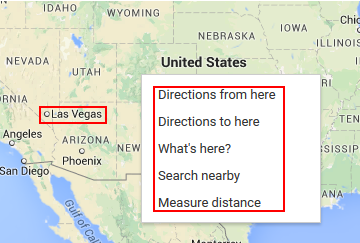
Also, if you right-click at a point on the map, a menu will open with several options. Left-click on one of them to choose it. They are:
- Directions from Here: Activates the Directions function in the “Search and Information” window in the top-left corner (if it isn’t already active), and designates this location as your departure point.
- Directions to Here: Activates the Directions function in the “Search and Information” window in the top-left corner (if it isn’t already active), and designates this location as your destination.
- What’s Here?: This option is basically the same as left-clicking at the location.
- Search Nearby: Takes you to the “Search and Information” window in the top-left corner, and narrows your search results down to locations within a certain distance of the location that you’ve specified.
- Measure Distance: Allows you to designate this location as one that you want to measure distance from, or, if you’ve already picked a starting point, designates this location as the one you want to measure the distance to.
There are a few more tricks that come in handy on this screen:
- Moving the map: If you click and hold the left mouse button down, moving your mouse around allows you to move your view on the map quickly. Release the left mouse button to stop moving your view. (You can also do this by clicking in the main screen, and then pressing the directional arrow buttons on your keyboard.)
- Zooming In: When your mouse cursor is on a point on the map with limited information (e.g. not the name of — or an icon representing — a location), click the left mouse button twice in rapid succession to zoom in on the map.
- Zooming Out: When your mouse cursor is on a point on the map with limited information (e.g. not the name of — or an icon representing — a location), click the right mouse button twice in rapid succession to zoom out on the map.
Search and Information
This is probably the next most important area of Google Maps.

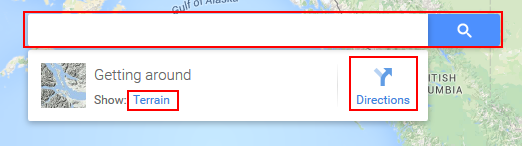
Click inside the box next to the search button and type in a location that you’d like to search for. It could be a country, state/province/territory, city, address, business, famous landmark, or even a set of coordinates. As you type, Google Maps will suggest places that it knows, with places within your current map view being near the top of the list. Click one to select it, or click the search button to search for exactly what you typed in (or Google Maps’ best guess as to what it is).
Below the search box is where you’ll see information about a location that you’ve selected. You can also click any of the options beside “Show” to view additional features on your current view of the map, such as known bicycle paths or how fast traffic is moving on major streets. Depending on things such as whether you’re using Standard View or Satellite View, as well as how far you’re zoomed in or out on the map, certain options may or may not be available.
Beside the information window is the Directions button. Clicking it allows you to input a starting point and a destination, and then view step-by-step instructions — both in text and on the map — for how to travel between the two using various routes and methods of transportation. This is one of the most powerful and useful features of Google Maps, so be sure to see our Google Maps Directions tutorial for an in-depth lesson on how to use it!
Google Options
The top-right corner has a few options that aren’t directly related to Google Maps, but have to do with Google and its other products.

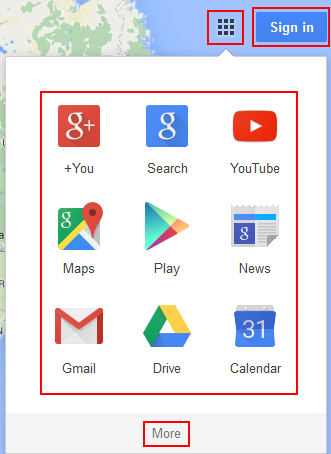
Click the applications button to open a menu that displays some of the other services that Google provides. Click on one to go that service’s website, or click More to see other options. After that, you can click Even More from Google to see a list of most of the popular services that Google provides.
You can also click Sign In to open a prompt where you can sign into your Google Account (which will most likely be your Gmail account, if you have one). If you are already signed in, your account address or picture will be displayed here instead. You can click it for options such as viewing your account profile, changing your account picture, or logging out of your account.
Logging into your Google Account while using Google Maps can open up a few more options, such as the ability to create your own custom maps. (We may cover this in a future tutorial.)
Map View Toggle
In the bottom-left corner is a button that allows you to switch Google Maps between Standard View and Satellite View. Standard View (which will probably be active by default when you first get to Google Maps) looks like a traditional map, with an emphasis on transportation and urban planning. Satellite View uses satellite and aerial photography to focus more on distinctive features of terrain and buildings.

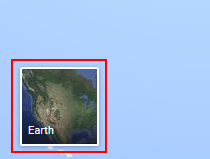
Click the button when it says Earth (or Satellite) to switch from Standard View to Satellite View. Click it when it says Map to switch from Satellite View back to Standard View. Depending on which view you’re using, some features may be different in the “Map Controls” area of the map (more on that in a moment).
Map Controls
There are quite a few different options here, so we’ve marked the important ones with red numbers. See the corresponding caption below the screenshot to find out what each function does.

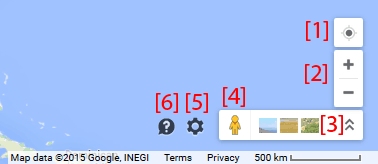
1. Show My Location – Clicking this button will let Google Maps use your Internet connection address to find the general area that you’re in and adjust your map view to focus on that location.
2. Zoom In/Out – Click the “+” button to zoom in on the map and see a specific area in more detail. Click the “–” button to zoom out, showing a more general area with less detail; this is useful if you want to move your map view across longer distances at once.
3. Show/Hide Imagery (Explore) – Click the arrow buttons here to show or hide (respectively) a list of interesting images that can be seen in the locations visible in your current view of the map. Some of them are still photographs, while others are “photo spheres”, panoramic photographs that let you see a 360-degree area around a fixed point.
Some are even “Street Views”, which are basically “photo spheres” except that you aren’t stuck in one spot — you can move around and view different locations in the general area!
4. Browse Street View Imagery – Click this icon to highlight areas on the map in blue (or sometimes yellow) where the “Street View” function is available. Then, click on one of those areas to activate “Street View”.
You can also click and hold the left mouse button on this icon, then move the mouse to drag “Pegman” (the Google Maps mascot) to a location on the map highlighted in blue or yellow, and then release the mouse button to immediately access “Street View” for that area.
5. Settings – There isn’t really much that you can do here, other than view your search history and change your search settings for Google Search.
You can also use this menu to share your current view of Google maps over email or social media, or embed it so it shows up right on your website (if you have one). You can also sometimes change the language that you’re viewing Google Maps in.
6. Help – If you need further help, click this button. Here, you can do things such as let Google know what you like and dislike about Google Maps, search for more specific help on an aspect of Google Maps, get tips on using advanced features of Google Maps, or switch back to the classic version of Google Maps.
And that’s a quick tour of the different features of Google Maps! Check out some of our other tutorials to learn how to use some of the more handy ones!